Read EXIF data original Panorama adjust horizon adjust cardinal direction dye upper area
like the sky
dye lower area
like the underground
improve colors, contrast, brightness manipulate EXIF,
save picture - ready!
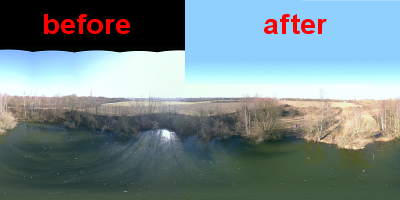
      Pauls Panorama Program

If you have taken a panorama picture (360° photo), you may also like to publish it. Suitable media such as Facebook or Google Maps require certain features in the uploaded images, so that they are accepted and recognized as a panoramic image at all.

Paul's Panorama Program edits panoramic images so that they have the required properties and can be successfully uploaded. (Google can still take many hours after uploading, until the photo is actually available in Google Maps or Google Streetview.)

The source material is a panorama image that has been compiled from several single images, for example, with Microsoft's Image Composite Editor.

With Paul's Panorama Program you can do the following work steps:
  • bring the panorama to a size of 6000 x 3000 pixels
  • rotate the panorama so that the north direction is in the middle of the picture
  • in addition, adapt the areas added to the panorama to the color of the sky and the underground
  • change hue, saturation, brightness, contrast and gamma
  • blur selected areas of the panorama (privacy)
  • manipulate EXIF data:
    • transfer GPS data and recording date from one of the single images
    • allow manual changes
    • enter copyright, author etc.
    • set "RICOH THETA S" as camera model (distinguishing feature for Panoramas)
See screenshots of the main working steps!
New: Correct Stitching Mistakes!
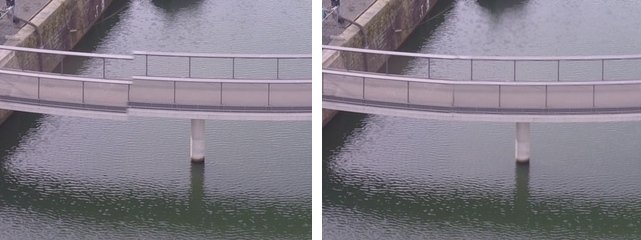
During stitching of single frames to a panorama picture
mistakes can happen. Paul's PanoramaProgram offers now
the possibility to correct those mistakes by distorting.

More informations
Stitching mistake Mistake corrected!

Installation:       Version 0.9.52 from 18.11.2018
Working Steps:
The main steps are performed by buttons on the tab "EXIF". It is recommended to follow the given order. The currently suggested button has a blue arrow, completed steps get a green tick.

1. Read EXIF Source
Select one of the photos from which the panorama was composed. ExifTool will read the GPS data, the creation date and some other data which are displayed in the text boxes. Manual changes are possible.

2. Select Panorama Source
Select the composite panorama image to be used as the starting material for the final panorama.

3. Edit Panorama
Now you can choose one of the other tabs to change the picture, depending on your wishes and requirements. The changes will only be finally adopted when you click on "OK".
Attention! The Move function is basically the first step. This means that all changes made are reset as soon as you open the tab "Move" again! 4. Manipulate EXIF:
This sets the camera model to "RICOH THETA S". This is a 360° camera and Facebook and Google recognize that this is a panoramic image. In addition, depending on the settings, additional information (e.g. copyright and author) is provided as EXIF data.

5. Save Panorama:
Now all changes are applied to the original image, and the changed EXIF data is transferred to the final image. The final image has the same name as the original image, but extended by "-ppp".

6. Publish the Panorama to Google:
Obviously, you can only do this with a smartphone that has Google StreetView installed. Please read the instructions!